
So what are Site Shapers? They are quick installs of Joomla combined with all the modules, content, etc used on our demo, excluding stock photography. Within a few minutes you can have your site up, running and looking just like our demo. No more importing SQL dumps and installing modules. Just head on over to the download section of this template and grab a Site Shaper. Simply install the Site Shaper like any other Joomla installation, it's that easy!
How to setup a Site Shaper
- 01Login to your cpanel or your server admin panel.
- 02Locate the area where your databases are (usually labeled Mysql Databases)
- 03Create a new database
- 04Next create a new database user and assign it to this newly created database in the previous step
- 05You will then need to extract the site shaper to either a folder on your server or the root directory such as WWW. NOTE: if you already have a website in the root of your WWW folder, we suggest creating a new folder and extract the site shaper there. If your cpanel does not have an extract option or you cannot find it, you may also extract the contents of your site shaper in to a folder on your desktop and upload all the files via an ftp client to your server.
- 06Next, navigate to the url where you extracted the site shaper via your web browser.
- 07Continue through each screen until you reach the below screenshot:
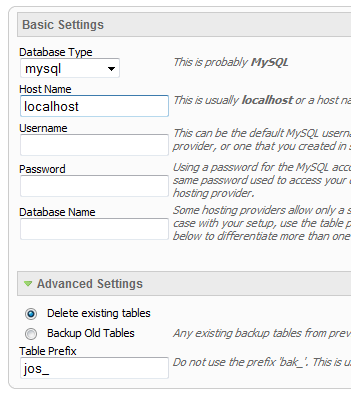
- 08At the above screen be sure to enter localhost as shown, continue to fill in the following text fields with your newly created database and username information
- 09Follow through the rest of the site shaper setup and click the install sample data at the last screen and the installation is complete! (be sure to rename/remove the installation directory after finishing the install)